Zhilong Zheng


  • Home

  • Tags

  • Categories

  • Archives

Seastar compile, run on Ubuntu with DPDK

Posted on 2019-11-16 | In Network

Introduction

  • Searstar is a high-performance userspace TCP stack, which can run with/out DPDK. We can refer to it at https://github.com/scylladb/seastar

  • Several similar projects: mTCP from KAIST, F-Stack from Tencent. All of them have well-written codebase.

Compile

  • Env: Ubuntu 16.04 with kernel 4.4.0-131, gcc/g++-7.
  1. Clone the repo: https://github.com/scylladb/seastar

  2. Checkout a stable version: cd seastar; git checkout remotes/origin/seastar-18.08-branch -b seastar-18.08

  3. Install dependencies: sudo ./install-dependencies.sh

  4. Configure compilation: ./configure.py --mode release --enable-dpdk . You might encounter configuration fail. You should upgrade the version of libboost, install yaml and fmt. An example output:
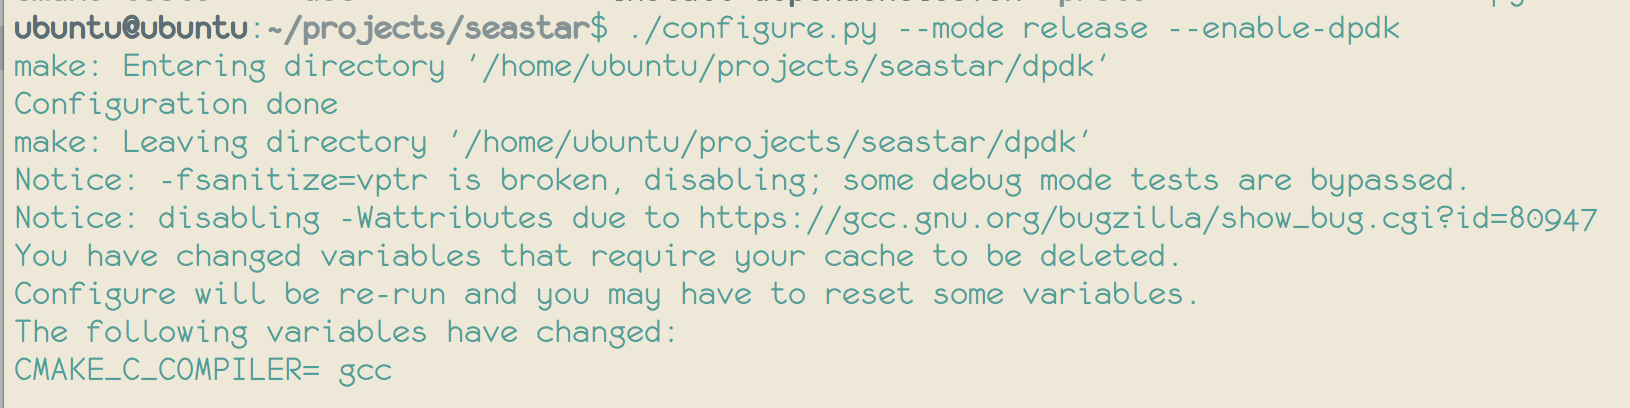
  5. Build the project: ninja. An example output:

Run an example app

  • Use apps/httpd as the example.

  • Run seastar-httpd on server S1; and on S2, use wget command to test whether it works well.

  • S1: Use DPDK’s dpdk-devbind.py to bind a NIC (XL710, 40G in my server) to ‘igb_uio’ driver. Then, running httpd with sudo ./build/release/apps/httpd/httpd --network-stack native --dpdk-pmd --dhcp 0 --host-ipv4-addr 192.168.11.4 --netmask-ipv4-addr 255.255.255.0 --collectd 0 --smp 2. You can change the ip address (192.168.11.4) with your own setting, and the number of CPU cores in --smp 2.

  • S2: First, run ping 192.168.11.4 to test arp. After httpd process in S1 is started. you will get


    Otherwise,
  • S2: Then, use wget to test http function - wget http://192.168.11.4:10000. You will get

Study of congestion control algorithms

Posted on 2019-11-12 | In Network

TODO

linux-kernel-network-improvement

Posted on 2018-11-22
  • 前言: 分析Linux标准TCP协议栈提升性能的方法。check其提升的历史

History

  • Bulk network packet transmission: lwn.net, patched in 3.18. SKB xmit_more

  • Batch processing of network packets: lwn.net, patched in 4.19, new NIC driver required

  • A reworked TCP zero-copy receive API: lwn.net, patched in 4.18 in net-next tree

  • A new kernel polling interface: lwn.net, patched in

Some Blogs

  • Tuning for wired 10G: pktgen

Methods

  • Disable irqbalance

User-level Stack

  1. mTCP
  2. F-Stack
  3. DPDK-ANS
  4. Seastart
  5. YAStack

可能的Insights

mxnet学习(0) -- 使用Docker部署单节点mxnet

Posted on 2018-08-22 | In mxnet
  • 环境: 单server, Ubuntu 16.04

安装并启动Docker实例

  1. 安装Docker, 按照官方教程安装: http://docker.org/

  2. 获取Ubuntu镜像,这里使用的是mxnet提供的image: sudo docker pull mxnet/python

  3. 启动一个Docker instance, 可使用

    1
    2
    3
    4
    5
    6
    #!/usr/bin/env bash

    instance_name=$1 # Name of docker instance
    cpus=$2 # Assignment of dedicated CPUs, e.g., 2,3,4,5

    docker run -it --cpuset-cpus="$2" -v /home/ubuntu/projects/mxnet-learning/incubator-mxnet:/mxnet-src --name $1 -d mxnet/python bash

这里使用了-v来指定共享目录,是为了直接在物理Host主机上编译mxnet的源码,方便在同一server里的所有Docker instances使用

编译源码

  1. 按照官方教程安装依赖库: https://mxnet.apache.org/install/index.html?platform=Linux&language=Python&processor=CPU

    1
    2
    3
    4
    sudo apt update
    sudo apt install -y build-essential git
    sudo apt install -y libopenblas-dev liblapack-dev
    sudo apt install -y libopencv-dev
  2. 下载源码: git clone --recursive https://github.com/apache/incubator-mxnet

  3. 开始编译
    1
    2
    cd incubator-mxnet
    make -j $(nproc) USE_OPENCV=1 USE_BLAS=openblas USE_DIST_KVSTORE=1

添加了USE_DIST_KVSTORE=1,因为后续会使用分布式的训练。编译需要等待一段时间

Python绑定

  1. 进入Docker instance。以name为mxnet-main实例为例

    1
    sudo docker exec -it mxnet-main /bin/bash
  2. 安装python依赖

    1
    sudo apt-get install -y python-dev python-setuptools python-pip libgfortran3
  3. 进入mxnet-src (docker run时设置的共享目录名称),并安装

    1
    2
    3
    4
    cd cd /usr/local/lib/python2.7/dist-packages # 建议进入python lib目录里把原有的mxnet给删除
    rm -rf mxnet
    cd /mxnet-src/python
    pip install -e .

验证

  1. 验证版本,从docker hub上pull的镜像自带mxnet环境,其版本号为1.2.1 (截止到2018-8-22 21:42), 通过安装github上clone的源码,其版本号为1.3.0
  1. 安装完整性验证,以image-classification为例
    1
    2
    cd /mxnet-src/example/image-classification
    python train_mnist.py

First blog on hexo

Posted on 2018-08-22 | In test

Welcome to Zhilong Zheng’s blog.

Zhilong Zheng

5 posts
3 categories
4 tags
GitHub
© 2018 — 2019 Zhilong Zheng
Powered by Hexo
|
Theme — NexT.Mist